From stones
To make ladybugs we need:
- black gel pen;
- pencils;
- several brushes;
- acrylic paint and varnish;
- some PVA glue.
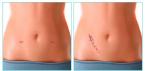
After the acrylic layer has dried, you can start drawing the main contours with pencils. 
Then we draw with paints, first with two layers of red, and after black we make out the front and back parts.
At this stage, we need to get a few blanks before more painstaking work - detailed drawing. Start with the black dots on the wings using a thin brush, and continue with thin lines on the body using a black gel pen.
White paint is used for the muzzle: in front we draw eyes, eyelashes and a smile. We give a glossy shine with acrylic varnish and fix the painting. 
The choice of a place where to place the made masterpieces depends only on your imagination.
Did you know? Despite the cuteness of these insects, ladybugs are real predators in their world, exterminating many insects that are harmful to cultivated plants.

From plastic bottles
You can make a ladybug very simply and effectively from plastic bottles. They will not be very similar to real insects, but will be a good decoration for your garden.
Take several colored plastic bottles, the size of your choice and something suitable for the role of the insect's head (round or ball). All this will eventually be attached to each other with universal glue.
The lower part of the container, which we will cut out with scissors, will act as the body. For plausibility, we will take just a small part of the whole bottle. 
On the cut off part, we will apply characteristic black spots with the help of paint. On transparent bottles, the pattern will look less convincing than on colored ones. But the situation can be corrected with acrylic paint and indelible markers.
You can use something round as a head, even a bottle cap. 
 If there are old unnecessary toys available, then you can borrow eyes from them and make the insect even more convincing. You can also just draw them.
  Mustache will have to work hard. It can be glued hooks or wire. If the head is made of something soft, then the antennae can be attached by simply piercing it.
From balls
To make a ladybug from balls, you need to take:
- balls;
- primer;
- acrylic paints;
- sandpaper;
- brushes.

Any oval or spherical object is suitable for making an insect. In this example, golf balls are used. Take sandpaper and polish the roughness on the ball, then prime with a spray. After the primer dries, apply red paint. Then with a brush we apply the main elements of the appearance of the insect: wings, spots. We use white paint for the eyes. To protect against environmental influences, we will cover our bugs with a transparent varnish.
 We place our creations on our site and surprise our loved ones.
From helmets
To make a ladybug from a helmet with our own hands, we will take, in fact, the helmet itself, paints of a suitable color and brushes. Construction, mining and even children's will do. Buying them is not difficult, but some craftsmen still prefer children's bicycle or toy helmets.
Let's paint our plastic blank with one color. Then draw a strip in the middle with black paint. This will be the place where the wings of the insect meet. Decorate the rest of the space with black spots. 
The front part is painted like a muzzle - a mouth and eyes are drawn. We let our work dry well and fasten it to a wooden surface with small screws.
From bowls
To make a ladybug out of a bowl it is necessary to perform the same manipulations as with a helmet, due to the similarity of these two objects. 
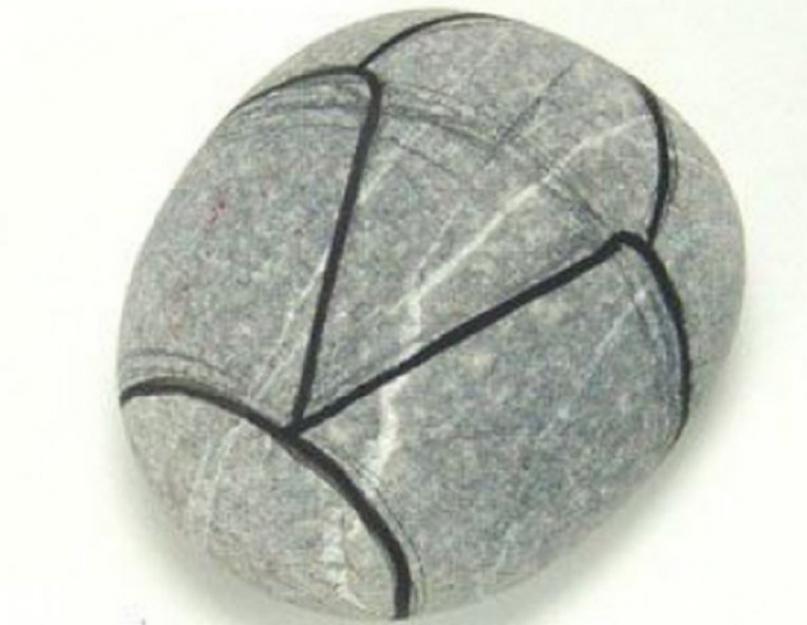
from cement
We need a container (an old ball cut in two). A mixture of cement and sand is poured into it in a ratio of one to three and water. The consistency should be creamy. The bottom is pre-lined with a film or bag. This will make it easier to remove the workpiece from the mold, which is best placed in a recess in or a bowl. 
The workpiece will harden for several days. From polyethylene, we will not get an absolutely flat surface. 
We will get rid of the remnants of the film and level the surface with a solution, to which we will add additional tile adhesive. Rubber gloves must be used to protect hands.  Next, let's start marking and painting. To do this, use crayons, pencils, coals.
  Finishing will be carried out with multi-colored mosaic tiles cut with a tile cutter.
  Glue the tiles with tile adhesive. After a while, we overwrite the seams and cover with a water-repellent agent.
One of the most important attributes of protection, which requires a construction specialty, is a helmet. A construction helmet is a protective headgear used to protect the head from injury. They can occur when heavy objects fall, electricity, precipitation.
History of the construction helmet
The beginning of its existence, the helmet dates back to the 16th century. At that time it was used by warriors, it was made of metal. It is she who is considered the progenitor of modern helmets. If the ancient protective headgear was notable for its considerable weight, then modern technologies and use latest materials, to minimize it. The first construction helmets for workers began to be produced in the seventies of the XX century. They were made of plastic, were fragile and bulky, could not provide reliable protection and ease of wearing. Staying in them for a long time was inconvenient.
Requirements for a modern construction helmet
In order for a construction helmet to acquire the status of a full-fledged means of protection, it must comply with the current GOST and have a marking confirming this. Qualities that characterize the convenience and reliability during operation:
- the presence of ventilation holes in the side parts for good air exchange;
- comfortable chin strap;
- smooth regulation of the size;
- breathable lining;
- shock-resistant outer part;
- the presence of a damping mechanism.
Most of the products currently manufactured meet these requirements. Even those of them that have a low price. The price difference among such products is significant. Simple Models cost from a hundred rubles. Products of well-known European brands have a good reputation due to high quality. Accordingly, its price is much higher.
As an example, you can pay attention to the manufacturer DeltaPlus (France), whose products meet all the necessary safety and comfort standards:
- Helmets have an impact-resistant housing made of ABS plastic, which is characterized by increased strength.
- The fastening system is the company's own development, it may vary depending on the size of the head.
- Optimized air access system to protect against water intrusion.
- Eight-point attachment using three straps.
- The inner part is equipped with a thermophilic lining that absorbs sweat.
Possible differences between expensive and cheap construction helmets
Budget construction helmets, as well as more expensive options, have similar features. For the production of the housing, an impact-resistant type of plastic with low electrical conductivity and low weight is used. This provides protection against mechanical damage and electric current. There is a visor that protrudes in front and protects from the blinding sun. Some of the models have such qualities as heat resistance, especially valuable when working near open flames and welding.
Fasteners in both versions provide a secure fit. The inner part partially absorbs impact. Helmets from the low price segment are plain, made in standard colors - often orange, white, yellow, red. Previously, the color indicated the position held. Orange and yellow were worn by workers, white - foremen, heads of enterprises, red - site foremen, engineers. Now there is no such division.
Expensive models are distinguished by the presence of a moisture-absorbing lining made of breathable fabrics. The chin strap, which tightly fixes the headgear, is made from natural materials. There is a forehead part in the form of an obturator. In some models, there is a place for fastening glasses and a company logo. For connoisseurs of originality, there is even the possibility of their author's performance.
Will it be the right decision to purchase the cheapest helmets? Most importantly, determine the purpose of their purchase. For large construction organizations, this will be appropriate. Any of them will provide the necessary level of safety for the employee, as it passes the necessary tests before being put on sale. The reliability of the seller and the availability of a quality certificate will be important. Expensive helmets are bought in limited quantities and are intended for those employees who, during work, will need their additional features.
Construction helmet adjustment
What will be required in order to be able to create a helmet attachment system in the chin area? It is necessary to have a protective headgear with a suspension system in which two crossed slings are involved. It is desirable that there is a plastic header for a snug fit on the head.
What sling and accessories will be required:
- slings 2 - 2.5 cm wide and 2 meters long;
- tridentfastex lock -1 pc;
- fastex with 2 slots - 2 pcs;
- fastex with 3 slots - 1 pc.
It is necessary to comply with the size of the sling and fittings.
Manufacturing process:
- Four holes are made in the helmet, into which the sling will be inserted - two in the area of \u200b\u200bthe visor and temples, and two in the back of the head (close to each other).
- Slings are pulled through the holes obtained, starting from the back of the head, with inside out.
- After that, each edge is threaded into the fastex holes with 2 slots and into the trident lock, thus creating the back half of the fastening system.
- By bending and threading the sling in the opposite direction, through the fastex with 2 slots, the side part of the mount is obtained.
- The edges of the sling are passed through the holes in the front of the helmet.
- Having put on a helmet on the head, the tension of the lines and the convenient location of the fittings are adjusted. One of the ends of the attachment should be longer so that the trident lock is located on the side of the chin. On the short side it is necessary to place the latch of the lock.
- The short edge of the sling is wound into fastex with 3 slots on the outer side of the helmet and secured with a thread and a needle.
- The long edge, passed into the fastex with 3 holes, will be used as an adjustment.
These simple manipulations will allow you to easily adjust the helmet fastenings.
Rules of operation, care
When choosing a helmet, it is worth considering the correspondence of the size of the helmet to the volume of the head. It should not have deformations of the body and constituent elements. If damage has been received, the item must be replaced. Independent replacement of any component parts is prohibited. When the construction helmet is not in use, it must be stored properly, at a temperature of 15°C, without exposure to sunlight, acids, solvents. The shelf life from the date of commencement of use is three to five years.
How to properly clean depends on the degree of contamination. Usually enough water and non-aggressive detergent. But you can use chlorine-containing liquids, there will be no harm from this.
Many years ago, people began to decorate their homes. A large number of flowers, figurines of gnomes and rabbits in the garden pleasantly surprise, delight the eye and give aesthetic pleasure. It is worth placing several of these stylish elements on your site, and you will immediately see how it will change. In addition, making decorations is very simple and fun with family and friends: any materials that are at hand will work for this, and the costs are minimal. Since childhood, everyone has liked the ladybug, this symbol of good luck that comes to us from the sky, and we put it on our finger and send it back, saying different words. So why not please yourself and others by creating such charm yourself. A great idea is a do-it-yourself ladybug from a helmet. So an unnecessary old thing will turn into a small miracle. From such creativity your children will be delighted, and fine motor skills hands contributes to the development of intelligence.
We make a ladybug from a helmet with our own hands in stages
In order to create a ladybug quickly and easily from a hard hat, you will need:
- Unnecessary construction helmet;
- Red, black paint (white optional);
- Brushes.
If you want to add antennae to the sun, then for this you can take tubes from a used spray gun, wire and a drill to make holes for them.
Making a ladybug with your own hands from a helmet is absolutely not difficult. Even a child will understand how to create this lovely insect after reading this article and watching a master class on making various photos and videos. What will be the result of your creativity depends on the materials that you use in the process. For example, if you take a red or orange construction helmet, then it is no longer necessary to paint it.
Well, let's look at the sequence of actions when creating a ladybug for a garden.

- The first and most important thing we need is a helmet. You can use a helmet of any color, but, as mentioned above, it is better to take a red one so as not to bother much with painting. It must be washed and it is desirable to cover the surface with a layer of primer so that the paint lays down more evenly and does not peel off over time.
- Further, to match reality, the helmet must be painted red. If you want to decorate the area with colorful ladybugs, use any color scheme. To heighten the effect, so that the insect shimmers and shimmers in the sun, it is better to cover it with acrylic paints (even in 2 layers).
Tip: painting is best done in the evening, as under the influence of the sun and when elevated temperature paint may lose its properties and lie unevenly on the surface.
- While the painted helmets are drying, we make mustaches for our ladybugs. To do this, we take the tubes from the spray gun, thread the wires into them, bend them as we want. Next, we drill small holes near the visor of the helmet and put them in there - here the mustache is ready. If desired, they can be made from iron rods.
- The paint is dry, let's move on to the design. For those who do not like to bother, you can just take a black marker and draw circles, stripes. But will it be as effective as it is fast? No. Your ladybug will swim at the first light rain. So we take black paint (again, acrylic can be used) and draw circles. To make them smoother, you can draw with a plastic cup and a pencil, then paint over.
- At this stage, we create a muzzle for our BC. Eyes can be drawn with white and black paint, cut out of paper, or you can buy ready-made eyes for toys and stick them on. At will, we draw a mouth, cling to the paws, decorate with beads, rhinestones, threads, etc. Everything, our ladybug is ready.
You can place such a charm created by your own hands anywhere. It will look great on a tree, a fence, in grass, among flowers, on a stump, even in a house on a bedside table. But most likely the children will take the BC for their games.

You can make a ladybug using a construction helmet in a completely different way. For this, the helmet is used as a mold. Pour a thick cement mortar into it and spread the mass on a flat surface. It is best to dry this blank under a film so that it does not crack. Next, paint it in different colors - and voila. Thus, with the help of one helmet, you can make many ladybugs for the garden. It is a pity that such suns can only be planted on a horizontal surface: since the craft is heavy, you cannot place it on a tree.

A selection of videos on the topic of the article
Here are a couple of different video ideas to create with detailed instructions for making. Create, decorate, enjoy!
Rita Vasilievna Alekhanova
Dear colleagues! I bring to your attention, crafts made from recycled materials, such How: plastic bottles, mayonnaise buckets, containers from Kinder Surprises, wood and some others materials. All work was done by the hands of educators Alekhanova R. V. and Grishina S. S. Some parents (Safronova O. O., Galochkina V. I., Soboleva Z. P., Kachalina O. A.) also took part in the work on the improvement of the site of the younger group of our kindergarten.
Creation crafts do-it-yourself is very exciting and entertaining process, which helps to do something good and interesting on your own. In fact, in addition to our huge and indefatigable desire to manufacture crafts With your own hands, you don't need anything else. Oh yes, still material, but these are mostly small things that can be found at home.
I'll start with crafts, made by me and the teacher Kirpichenko E.I., for the contest "Magic World of Soyuzmultfilm"
"Thumbelina"

Hedgehog with apples.


This locomotive was made from oak poles.

And this cow and frog are made from mayonnaise buckets. Composition "Cow in the meadow"

And this beauty is made from a tin tank.

The caterpillar is made from mayonnaise lids, legs from containers from Kinder Surprises"

Fly agaric from the necks and bottoms of plastic bottles.

Ladybugs from construction helmets.

Dragonfly.

Caterpillar.


Thank you for your attention!
Related publications:
To decorate a playground, it is not at all necessary to buy expensive garden decor. DIY crafts will allow the site to look.
How useful is manual labor in kindergarten? Parents sometimes do not understand why and why we, teachers, do so often during work.
In addition to building material, paper, waste material is also used in kindergarten for construction. When teaching children to design.
Over the past few years, we have been holding a competition in the Obruchevsky district for the best New Year's toy for the Christmas tree in Vorontsovsky Park.
Material: Boxes of juice 2 liter, yogurt different shapes 2 pcs, a box from a New Year's gift (you can use another box that fits.
I am pleased to present to your attention, my work. Kravtsova Olga Mikhailovna Quilling. Recently, increasing popularity.
With the children of our senior group MBDOU " Kindergarten combined type No. 174 "we were preparing for the holiday on February 23. In preparation.