A powerful battery... And an impressive cost. Yes, there are economy options, but is it possible to spend even less? And if so, how to make an electric scooter with your own hands?
Where to begin?
Decide on the basis on which you will make your iron horse. There are three good, tried and tested options:
- From a screwdriver. Drills and screwdrivers are convenient in that the battery is very easily pulled out of them for recharging. In addition, most models have several speeds, which is also quite a lot;
- From hoverboard. Very good in terms of battery connection and control, but quite expensive;
- Out of the engine cooling radiator. Perhaps the most difficult option from the point of view of implementation, but the motor is quite powerful and almost free (you can find a suitable engine at any auto parsing).
If you do not have much experience with such tasks, we recommend making an electric scooter with your own hands from a screwdriver.
Broadcast
Have you chosen an engine? Now it is important to decide how you will transfer torque from it to the wheels. The following transfer options are available:
- Chain;
- Friction nozzle;
- two gears;
- Hard transmission.
Again: if there is not much experience, put the chain. The option is controversial, because the chain can fly off and, but in implementation it will be the easiest way.
wheels
Which wheel will drive: rear or front? If you choose the rear, it will be easier with the installation, if the front, the scooter will be better controlled. We advise you to still get confused with connecting the front wheel, it's worth it. The wheels themselves can be taken the most ordinary, with plastic discs. Garden cart wheels work well.
Frame
The frame is made from ordinary steel pipes. Profiled steel with a thickness of 2.5 millimeters will be quite enough for a do-it-yourself electric scooter to withstand a load of up to 100 kilograms.
IMPORTANT: If you are making an electric scooter not completely from scratch, but on the basis of a conventional - not motorized - scooter, you will not have any issues with the frame and wheels. Just choose from durable and stable models: very elegant ones may not be ready for serious loads.

Battery
Do not take heavy lead batteries! You most likely won't be able to tuck them neatly under the deck and the battery will just break the whole balance of your scooter. If you do it on the basis of a screwdriver, there are no questions - use your own battery - if not, look at for electric helicopters, the same drills and similar equipment.
Also you will need
- wires;
- Button or toggle switch;
- Plastic box for battery;
- Fasteners (as a rule, these are bolts and nuts).
It is not necessary to use welding or similar technically complex fastening methods.
How to make an electric scooter with your own hands?
The best choice would be to watch a video on YouTube before starting work. Look specifically for the assembly of the scooter based on the engine you have chosen and with the gear you have chosen - there are videos for almost all existing options.
And, in any case, you will need some experience in working with your hands. Ideal if you have already worked with electrics and metal. If there is no experience, we strongly recommend finding an assembly partner or at least a consultant - a person who can look at your idea and project, give their comments on it.
If you do everything carefully, a do-it-yourself electric scooter will cost only 5-7 thousand rubles, which means you can save a lot. Good luck with the build!
The dream of every boy is to ride a scooter. However, modern girls are not averse to a ride. But, now a more desirable replacement has appeared for an ordinary scooter - a scooter with a motor. And not only a child, but also an adult can ride on it with a “breeze”.
For the smallest children (4-7 years old) you can buy an inexpensive scooter "Hummingbird" which is available in blue and red.
Its top speed is low. 10 km/h, but for a kid, riding such a scooter is a real rally. You can drive on one charge 4 km. Will withstand the folding design of the child weighing up to 40 kg. The scooter itself weighs only 8.2 kg, i.e. a child can easily lift it to the floor on their own. Wide footrest - 580x130 mm, wheel size with tires in diameter - 137 mm, which indicates reliability and safety vehicle. Wheels on bearings and they are made of durable plastic. Throttle for speed control, solid tires, rear drum brake lead-acid maintenance-free battery requiring up to 8 hours to full charge, motor 120W are the main characteristics of the model. A dream, not a scooter!
Where to buy a Hummingbird scooter and its cost?
The cost of this miracle toy and at the same time a personal vehicle only 69 dollars . You can buy a scooter at e-bike.com.ua .
Small costs and imagination will help to make a scooter from a conventional cordless drill
In the trading network today, the choice of electric scooters is huge, but you can easily make an electric scooter from a battery drill, well, you still have to disassemble grinder. Craftsmen who already ride scooters with a motor who made them with their own hands say that a motor that develops up to 550 rpm, quite enough for driving on city streets.
The battery is also suitable from a drill - 14.4 V
The frame can be made from ordinary profile steel pipe(wall thickness 2.5mm) - it will withstand weight in 100 kg. Or use a frame from a regular scooter. In a bike shop, you need to purchase rubber handles, a steering wheel mount, a thrust bearing, designed for a load of 300 kg. To transfer rotation to the wheel, there are several options: using a chain, two gears, a friction nozzle, using a rigid gear and a motor-wheel. But, the last option is practically impossible to implement, because this important part must be ordered in China.
Immediately you need to decide which of the wheels will rotate? To connect the generator, you will also need an overrunning clutch (it is also easy to buy), bearings, wheels. The battery will fit lithium polymer(11.1V 2.2Ah). With a little conjuration over all this, you can get a good vehicle.


How much does it cost to make an electric scooter from a drill?
The cost of making an electric scooter with your own hands is about five thousand rubles, against the cost of construction in the trading network cost 14-140 thousand rubles.
Useful link, do-it-yourself electric scooter: http://www.samartsev.ru/nikboris/gallery/2011/samokat/samokat.htm
Today, there are a fairly large number of factory-made electric scooters on the market and you can choose for every taste and budget.
But any product, as you know, is designed for the average buyer.
One is foldable and lightweight, but it drives slowly and doesn't start from a standstill.
The second one starts and accelerates perfectly, but is too heavy.
What to do if you want a scooter exactly for your needs?
There are two options - either take the factory one and modify it, or assemble the device yourself from scratch.
Both options have the right to life and which way to go is the personal choice of everyone.
I will try to describe how the set of elements for self-assembly is completed.
The main element of the assembled scooter is the “base”.
Bases of scooters are conditionally divided into subspecies:
Micro - with wheels up to 8 inches,
Mini - wheels 8-10 inches,
Midi - 12-16 inch,
Maxi - from 20 inches and more.
Scooters with wide, non-bicycle tires stand a little apart. Reno, Evo, Scruzer and their clones are also considered scooters, although in terms of engine power and appearance they are clearly closer to scooters and scooters.
So the base, it is from it that you should start dancing.
The final driving performance of the electric scooter depends on the choice of base.
What should you pay attention to first of all?
The dimension of the wheels, cast or inflatable, the presence of a suspension, a place for a convenient location of the battery and the width of the dropouts for installing a motor wheel.
If your city has mirror asphalt that is washed with shampoo every evening, then 5.5 inches is fine for you.
If the tiles and cracks in the asphalt - 8 inches is the minimum and pneumatics is highly desirable.
If your asphalt recent years 10 did not know the repair - do not even look below 12 inches.
Do you want to drive at a speed of 40 with a tail and not be afraid to fly head over heels in an unexpected hole? From 16 inches and above.
Suspension reduces some of the bumps on small wheels, but the rule "a wheel can run over an obstacle no more than half its diameter" will not go anywhere.
Battery location. Options - in the deck, in the steering rack, on the steering wheel in a bag or case, on the trunk, in a backpack.
Some scooters have a cavity in the deck that allows it to be used to pack battery packs.
Pros: low center of gravity appearance. Cons - it may be necessary to additionally protect the battery from impacts on the ledges of the roadway.
A battery can be placed in the steering rack if it consists of several pipes and there is free space between them. Pros - the battery does not significantly affect the weight distribution of the scooter, in the manufacture of lining the scooter is not afraid of falls. Cons - the complexity of the work.
Also, some scooters have bottle mounts on the steering column, where you can screw a case or battery in a “bottle”. Pros - ease of installation, ease of removal. Cons - interferes with driving, when falling, you can break off the fasteners.
On the steering wheel in the case, you can place the battery. Pros - ease of installation, ease of removal. Cons - deterioration in weight distribution, more tangible blows to the front wheel. If dropped, there is a chance of breaking the case.
On the steering wheel in the bag, as a rule, batteries are made for small and folding scooters. The bag for photographic equipment is sufficient for a small battery and does not attract attention. Pros - ease of installation, Cons - the risk of damage to the battery when dropped.
The battery on the rear rack is a popular solution for the first e-bikes. For scooters, it is of little relevance, due to the lack of a trunk on most of them. Pros - ease of installation, ease of removal. Cons - change in weight distribution, tangible blows to the rear wheel.
It is also possible to ride with a battery in a backpack and a wire with a connector for the scooter itself. Pros - the ability to insulate the battery for use in the winter. Facilitation of the scooter, due to which the maneuverability and aptitude for active riding with jumps are significantly increased. Cons - diseases of the spine from a constant load (depends on the weight of the battery), a change in weight distribution to the side of the motor-wheel.
Dropout width.
This is the distance between the seats in the front or rear fork of the scooter.
For micro and mini models, the standard motor-wheels are 45 or 65 mm. For more - 100 mm.
Bicycle micros for the front wheel just also have a standard of 100mm.
There are MK 110, with a brake disc, but less often.
135mm is already a bicycle size of the rear wheel, for gears on one side.
The electrical part of the electric scooter is quite simple, 4 points - battery, controller, motor and controls.
Previously, lead batteries were installed, heavy, with a low resource of 300-400 cycles and low charge-discharge currents.
Modern electric scooters run on varieties of lithium batteries - lithium ion, lithium polymer, lithium iron phosphate.
Let's take a look at the difference between them.
Lithium-polymer (LiPo) batteries have a favorable cost, high charge and discharge currents, and a resource of 500-800 cycles.
Lithium-ion (LiIon) - 500-1000 cycles, light weight, temperature dependent.
In general, ions have three subspecies, depending on the type of chemistry. Some have higher capacitance, but more internal resistance, others are high-current, but do not shine with capacity.
They require protection from mechanical damage when used on scooters. There have been cases of ignition of ions from impacts when falling.
Lithium Iron Phosphate (LiFePo4) - About twice as heavy as ions, more expensive. They give and receive high currents, the resource is 2000 cycles.
Not flammable, quite resistant to mechanical deformations. Can be discharged at sub-zero temperatures.
The scooter wheel drive from an external motor with a belt or chain is still found, but it is already clearly losing ground to the motor-wheels.
Wheel motor is the best choice of motor for self-assembled electric scooter.
They come in two types - geared and direct drive. We will analyze the difference, pros and cons of each type.
Gear mk.
Lighter than micro direct drive of the same power, better efficiency at low speeds. Excellent rolling due to the presence of a freewheel, which is very useful when using a foot-drawn scooter. There are wearing parts - gears, someday they will require replacement. Noise - the gearbox howls during operation. The impossibility of regenerative braking. Slightly better forcing potential, due to higher rotational speeds.
Direct drive (DD).
Heavier than gearboxes, reeling is worse due to the toothing effect. There are no wearing parts except bearings in such microns. Quiet, and when using a sine controller, they can be completely silent. They have the ability to use regenerative braking. They justify themselves when using the scooter in areas with large elevation changes and as a means of saving brake pads. When installing MK on mini and micro scooters, it happens that recuperation is the only adequate brake on board.
Controller.
The controller is the brains of our scooter, its choice will depend on the traction in the hills, the way of starting and the dynamics of acceleration. The choice of the controller must be made according to the parameters of the motor. For example, the wheel motor has the following parameters: 48V 350W, what does this mean?
The rated voltage of the motor-wheel is 48 volts. No one forbids applying less to it, but at the same time its power will be lower. No one forbids applying more to it, but at the same time it is important not to overheat the micron with the pumped power.
This is the rated power of this mk. As practice shows, the rated power can be boosted by 1.5-2 times for DD and 2-2.5 for gearboxes. To select a controller, let's convert watts to amps - 350/48 = 7.3 amps. Of course, it will run at 7.3 amps, but it’s rather sad, so we boost it to 12-15 amps for direct drive and 15-18 for the gearbox. For these currents, we will need to look for a controller for such a microcontroller.
Governing bodies.
1 - power switch.
The power supply is usually connected directly to the controller and does not break when idle. The power switch turns off the low-current part of the controller that supplies voltage to the control circuit. Since the currents there are small, you can use almost any suitable latching button.
2 - Gazulka.
It is a motorcycle-type throttle, or half or throttle trigger. I strongly recommend choosing the trigger, as it is easy to release in an emergency, and a person instinctively grabs the handle tighter to hold on. It has at least three wires - plus 5 volts, ground and output signal.
3 - Brake levers.
Electric scooters are equipped with brake levers with built-in limit switches to turn off the motor when the brake is pressed. If the controller has an activated regenerative braking mode, it will also turn on when any brake lever is pressed. There are built-in buttons, reed switches and hall sensors. Connection - ground, output signal. For hall sensors, + 5 volts is additionally connected. Sometimes, in order not to change the standard handles, separate modules with reed switches or hall sensors are installed. They are attached to a cable, or to the body of the handles.
So we figured out the general electrical device.
Consider assembly examples.
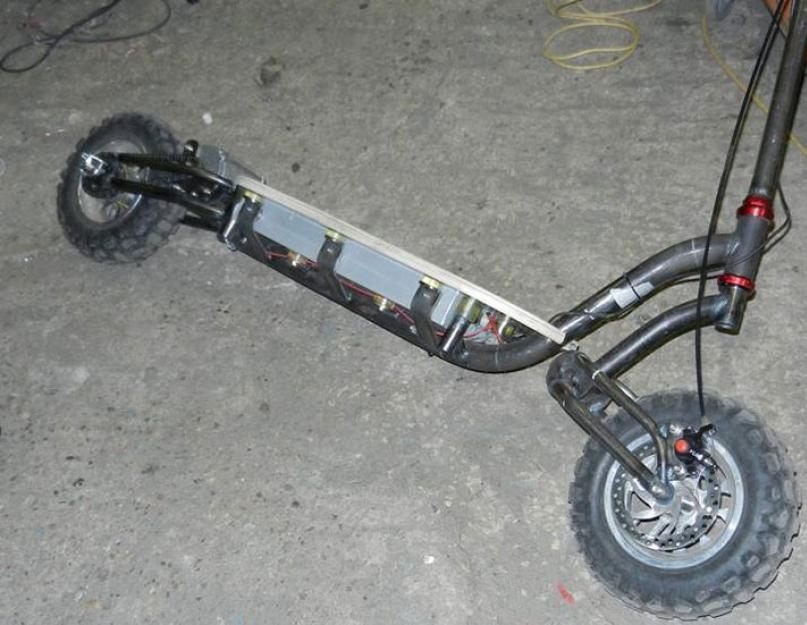
 In this project, the Yedoo Ox base was used,
 battery cells lithium iron phosphate
 and micro direct drive, with a diameter of 12 inches.

The battery is divided into two packs and placed in the deck and in the steering rack.


The controller is fixed under the steering rack, where it does not interfere and is always blown by air flow.
 The drive is rear, this is a convenient solution for climbing hills. The battery is protected from below by a 4mm alucobond plate.
 The final characteristics of the scooter:
Weight 18.5 kg.
Battery 16S3P, 52 volts 9 amp-hours.
There is enough on the Internet now. But their cost is often not affordable for everyone. As you know, the cheapest way to get any thing is to create it yourself, using only raw materials, handy tools and used parts of other devices.
Here is a small step-by-step instruction about how to assemble your own electric scooter with your own hands with minimal investment.
The scooter is designed for top speed about 30 km per hour, will have about 3 horsepower and will be able to travel about 18-20 km on a single charge.
Step 1: Parts and Tools
Below is a basic set of the most important components (parts) used and necessary tools. As much as possible, stock up on used parts from various electrical appliances that often gather dust in your attic or garage.
How to make a good one, and what you need for this:
Details:

Tools:

Step 2: Selecting a scooter base
The manufacture of a new homemade electric scooter must begin with the base - the frame of a former conventional scooter. The base from any classic Razor scooter will do, especially the front and rear wheel suspension, which uses springs and dampers rather than rubber, while it has a more elegant look. Converting a regular scooter to an electric scooter is the easiest way, but there will be a problem with the place for hanging equipment.

The wheels are unlikely to be able to use the old ones. They are usually worn out and the bearings are loose or broken. So the base wheels will have to be bought new (preferably with replacement tires). When choosing a frame and wheels, keep in mind that the future structure should rise 10-15 cm from the ground with the wheels mounted.
Step 3: Rear Suspension
To accommodate good wheels, you will need to assemble a completely new aluminum rear suspension. A few cheap mountain bike shock absorbers with a spring force of about 250-300 kg / cm will come in handy here. Similar details in in large numbers are sold in specialized markets / stores, there are also many of them at online auctions. The shock mounts are made from 1/4″, two 2″ and 1″ aluminum U-channels.
Step 4: Fork
As well as the rear suspension, the fork and front suspension will also receive a major upgrade due to the new wheels. Here you can also use the springs and shocks from a mountain bike fork to create a new pair of shocks with pivots at each end.

This design is much simpler and more reliable than a telescopic fork. The front wheel with this design can be easily centered in front of the axis of the steering column. It is very important to set the wheel slightly forward - this will greatly increase the steering performance. Don't be afraid to raise the front of the scooter a couple more inches if needed.
Step 5: Wheels
To fix the wheels to the rest of the scooter, you need to make your own axles from 1/2" threaded rods (studs) and appropriate nuts. The inner diameter of the wheel bearings will fit 5/8″, so to get a 1/2″ axle that will fit snugly on the bearings, you will need the appropriate pads. Electric scooter manufacturers make their parts unique, unsuitable for other models. Therefore, the choice of wheels you will have quite a large.

Nuts are screwed together until their flanges are pressed against outside wheel bearings. To fix the spacers in place, a second nut is additionally screwed on. Four more nuts are used to secure each wheel to the frame.
Step 6: Gearbox
Since the CIM motors we plan to use are relatively high speed, low torque motors, a gearbox is needed to reduce the output speed of the motors to an acceptable level. A self-made electric scooter, made by hand, will not be able to work without a gearbox: this is not a toy car, here you need to ensure a smooth start.
In principle, any two-speed gearbox will do. Again, we select used ones at the lowest price. Cut out the gearboxes to get rid of as much wasted space as possible and remove the housing completely to get a 3-motor gearbox with a single output shaft.

We install the gearbox on the scooter using the original bolt holes built into the gearbox and some aluminum angle parts bolted to the scooter frame. Finally, 21 sprockets for #35 chain are attached to the output shaft.
Step 7: Chain Tensioner
The most difficult part of the future electric scooter in terms of installation and subsequent adjustment is the chain tensioner. Due to its location, when the scooter's suspension is compressed, the effective chain length between the sprocket on the gearbox and the sprocket on the rear wheel increases. It must maintain (compensate for) the additional chain tension. In addition to the chain tensioner, the scooter also needed an idle sprocket.

When driving on uneven ground, jumping or hitting the body lightly, the chain can fly off the rear sprocket. To prevent this from happening, you will have to carve a special limiter. Building an electric scooter with your own hands from a conventional screwdriver will not work: too little torque.
Step 8: Brake
Motors and drive chains are great, but being able to stop your scooter in time is even more important. Since disc brake rotors are just large spinning metal discs attached to a wheel, you can simply use the wheel's drive sprocket as a disc brake.
It will be necessary to build a caliper to capture the sprocket from an aluminum block. To do this, we use an aluminum U-channel, two brake pads, springs and a few bolts. You can take absolutely any pads - this is a racing car.

right brake shoe we fix on a rod that passes through the caliper, springs and aluminum suspension frame. Since the spring expands in the middle, the brake is inactive and, if necessary, the brake cable pulls the two halves of the caliper towards each other so that they both move towards the sprocket and compress it from both sides, providing braking.
Step 9: Steering wheel
For more and more confident control, we need a wider handlebar, because the wheels we will have are quite wide. Almost any handlebar from both the Soviet model and modern mountain bikes will easily fit.

We fix it on the steering column, having previously adjusted the clamp with an aluminum bracket with a bolted tightening. If the steering wheel is quite thick, then you can easily place a throttle and a hall sensor in it.
Step 10: Frame (base)
How to make an electric scooter from the most ordinary scooter? The original frame from a standard Raiser scooter will be quite small. It can be used as the main platform for attaching an additional surface made of lightweight materials. This will provide more space for hanging components such as batteries. The new surface can be made of carbon fiber or high-strength plastic - this will significantly increase its wear resistance. We screw the new base on top of the old one with stainless steel screws with a countersunk head.

Step 11: Mounting and Connecting the Electronics
Mount the motor controller on the front side of the gearbox as close as possible to the aluminum corner of the frame to leave as much room as possible for the batteries. The main power switch is bolted directly to the deck of the scooter, while the fuse holder and the fuse itself are bolted to the bottom of the frame (you can use an aluminum angle or channel). It is better to use a 200A fuse as this is the peak motor current.

All electrical connections must be made with solid, conductive connectors. Do-it-yourself electric scooter diagrams and connection drawings can be easily found on the Internet for various types of engines, gearboxes and batteries of any capacity.
Step 12: Battery
For maximum lightness of the whole structure and energy storage, the best option would be to use 5 Ah lithium polymer batteries (for example, LiPo from HobbyKing).

With this volume, 8 batteries will be enough, we take one more as a spare. In large batches, defective items often come across. Of course, they can then be replaced in the store with a new battery, but it is better to take it with a margin right away. As a result, we get a battery with characteristics of about 60V and about 600W of output power.
Step 13: Battery Holder
DIY electric scooter assembly will not be completed without a battery attached to it. In this case, it is necessary to consider the possibility of a quick replacement of power supplies. To install the batteries on the scooter frame, we build a small aluminum or plastic box.

It is better of course to use polycarbonate and glue it with carbon fiber for greater strength. It is necessary to fix the box with countersunk bolts so that when moving, its head does not cling to the legs and does not protrude on the surface of the frame.
Step 14: Final Assembly
The final step is to assemble and solder the entire structure together. To do this, use a screwdriver with bits, open-end wrenches and a screwdriver. Tighten all bolted connections tightly, double-check them.

That's about it - the assembly of the electric scooter with your own hands is finished, you can go to the first field tests, and then refine or improve the resulting model.
Video
electric scooter- this is a convenient, modern and economically expedient equipment for everyday use, achieved by charging the battery with a conventional 220 volt socket. The only actual problem is the high cost of this gadget, no doubt all high-quality items have a high cost, which is manifested in the long-term operation of the charging battery and in the safe use of the transport unit.
An alternative solution to the cost of expensive equipment is to make a “do-it-yourself electric scooter”, but it is “extremely important” to have good experience and knowledge in the development of technical devices of this category of complexity. It is necessary to have sufficient knowledge and understanding of the principle of operation of an electric scooter, and most importantly, to have a clear idea and confidence in their capabilities.
The assembly of electric scooters can be carried out on the basis of the designs of various units. In most cases, two-wheeled equipment is used:
- mobile vehicles based on gyro scooters, far from a cheap option, but quite easy to rework in terms of connecting electric batteries);
- equipment based on a cooled radiator engine, such can be purchased from auto dismantlers. The difficulty lies in the mechanical design, but the output is a powerful unit.
For convenience, you can develop an electric scooter with a seat, which will be very convenient for long-term use. For these purposes, you need the frame itself, but which you need to build a rack with a connection. After assembling the frame structure, the speed transmission is assembled, the wheel is fixed, the battery is installed and the engine is mounted. The best and budget option would be to build an electric scooter based on a disassembled electric screwdriver, control will be provided by a moped handle, which is attached to the trigger and cable from the screwdriver. To carry out the torque of the wheel itself, a chain two-gear rigid transmission with a friction nozzle is used.
To make the frame, an aluminum or steel channel is taken, the seat can be taken from a bicycle, the wheel is suitable from any stroller or scooter. Variations with a battery can be different: depending on the cost, lithium or lead. The battery power should be at 12 volts each. Alternatively, you can remove the battery from an electric helicopter or an old drill.
In fact, in addition to the above spare parts, bolts of sizes M8 and M10, a toggle switch with a 10 ampere supply of electricity are also useful.
The assembly algorithm for a homemade electric scooter will be as follows:
- Measurement of the supporting frame with the selection of an aluminum profile.
- Fastening the support beam to the frame of the scooter using bolts and nuts of sizes M8 and M10.
- Holes are made on the back of the scooter for installing the engine.
- The wheel coupling is mounted inside the hub.
- A clamp is attached and bolted along the wheel axis, and a plastic box is installed under the frame into which the wire is pulled.
- Based on the stretched wire, an electrical circuit is formed that allows you to switch the engine and battery.
The main notable feature of such a homemade scooter is a portable battery, which is located in the scooter driver's backpack. The connection is made through a stretched cable.
The practice of self-made scooters shows that in order to successfully complete the work, it is necessary to make a small amount of effort and it may not be possible to save as much money as expected at the beginning of the work.