As a rule, from electric lamps it is desirable to obtain the maximum brightness of the glow. However, sometimes lighting is required that will minimally disrupt vision adaptation to darkness. As you know, the human eye can change its photosensitivity over a fairly wide range. This allows, on the one hand, to see at dusk and in poor light, and on the other hand, not to go blind on a bright sunny day. If at night you go out of a well-lit room into the street, then for the first moments almost nothing will be visible, but gradually your eyes will adapt to new conditions. Full adaptation of vision to the dark takes about one hour, after which the eye reaches its maximum sensitivity, which is 200 thousand times higher than daylight. In such conditions, even short-term exposure to bright light (turning on a flashlight, car headlights) greatly reduces the sensitivity of the eyes. However, even with full adaptation to the dark, it may be necessary, for example, to read a map, illuminate the scale of the device, and the like, and this requires artificial lighting. Therefore, lovers of astronomy, as well as anyone who needs to consider something in poor lighting conditions, do not need a bright flashlight.
In the manufacture of an astronomical lantern, one should not strive for excessive miniaturization. The body of an astronomical flashlight should be light and large enough so that in poor lighting conditions it can be easily found (otherwise you will drop it under your feet and look for a flashlight for half an hour). A road soap dish was used as a case. Switches should be such that they can be easily operated by touch and with gloves.


The eye is maximally sensitive to light from a long wavelength of 550 nm (green light), and in the dark, the maximum sensitivity of the eye shifts towards short wavelengths up to 510 nm (effect Purkinje). Therefore, it is preferable to use red LEDs in an astronomical lantern, and not blue, or even more so green. To red light, the sensitivity of the eyes is less, which means that red lighting will less disrupt adaptation to the dark.
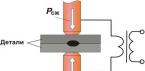
In addition to the main lantern, you can make several simple beacons to illuminate various objects. The fact is that few astronomy lovers can afford to have a full-fledged amateur observatory. Most are watching from the balcony. And in a tight space, and even in the dark, you can easily catch your foot and fill up the tripod of a telescope or camera. In addition, suddenly meet in the dark knee with the corner of a drawer or bedside table, the same pleasure is small. Therefore, it is advisable to use the simplest mini flashlights to illuminate tripod legs, sharp corners of furniture, shelves with accessories, and so on. In principle, just an LED fixed with adhesive tape on a 3 V battery of the type 2032 or similar. But, firstly, without a current-limiting resistor, the glow of the LED is too bright, and secondly, it is desirable to have a switch even in the simplest flashlight. Guided by these considerations, several such beacons were made.
A reed switch paired with a magnet is used as a switch. The 3 V battery mount is self-made. A current-limiting resistor is switched on in series with the LED, its value must be selected so that in the dark, with a direct look at the LED lens, the light does not blind the eyes even at close range. In different beacons, you can use LEDs of different colors to facilitate identification, while remembering that the eye does not have the same sensitivity to light with different wavelengths. You can use flashing LEDs.


In addition, a couple more designs of simple LED lights. The structures specifically described below were not intended for astronomical purposes, but they can easily be adapted for such use.
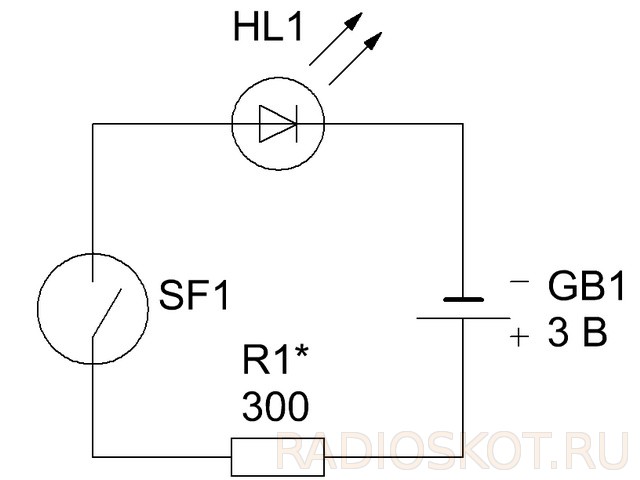
A simple waterproof flashlight can be made from a film can. We will need: a new jar of film, a 3 V LED, 2-3 reed switches, a 3 V lithium battery 2032 , cotton wool (case filler), a block for a battery from an old flashlight. To ensure water resistance, it is necessary that there are no holes in the body of the flashlight. So as a switch, you can use sealed contacts. For reliable operation, it is better to take 2-3 reed switches, since when turning along the longitudinal axis, the sensitivity of the reed switch changes. So, we collect a flashlight according to the scheme.

We bend the wires so that everything fits in the case, I filled the empty space with cotton so that nothing dangles. We place the circuit in the case. It is important that the film jar is new, i.e. so that the lid closes as tightly as possible. Any magnet will work as a switch. The flashlight of this design continued to work after 10 hours in the water. The cotton wool remained dry. So, long-term lying in a puddle will not damage such a device.


Surely radio amateurs have pads from failed 9 V batteries of the Krona type. On the basis of such a block, you can assemble a simple flashlight that does not actually need a body. An LED is connected to the contacts of the block through a current-limiting resistor.

Outside, the LED and resistor are wrapped with several layers of insulating tape. In the position put on the battery, the flashlight forms a single unit with it.


Thus, it is possible to adapt almost any suitable case and battery for a homemade flashlight, although below 3.5 V you will already need to install LEDs. Thank you for your attention. Author Denev.
Discuss the article LED FLASHLIGHTS WITH YOUR HANDS
Today, LEDs are embedded anywhere - in toys, lighters, household appliances and even office supplies. But the most useful invention with them is, of course, a flashlight. Most of them are autonomous and give out a powerful glow from small batteries. With it you will not get lost in the dark, and when working in a dimly lit room, this tool is simply indispensable.
Small copies of a wide variety of LED flashlights can be bought at almost any store. They are inexpensive, but the build quality can sometimes not please. Whether it's home-made devices that can be made on the basis of the simplest parts. It is interesting, informative and has a developing effect on tinkerers.
Today we will look at another homemade product - an LED flashlight, made literally from improvised parts. Their cost is no more than a few dollars, and the efficiency of the device is higher than that of many factory models. Interesting? Then do it with us.

The principle of operation of the device
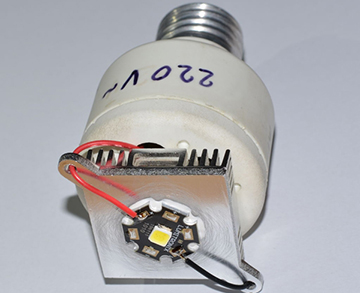
This time the LED is connected to the battery only through a 3 ohm resistor. Since it has a ready source of energy, it does not require a storage thyristor and a transistor for voltage distribution, as is the case with an eternal Faraday flashlight. An electronic charging module is used to charge the battery. A tiny micro-module provides protection against voltage surges and does not allow overcharging of the battery. The device is charged from the USB connector, and on the module itself there is a micro USB connector.Required Parts
- 20 ml plastic syringe;
- Lenses for LED flashlight with housing;
- Micro button switch;
- Resistor 3 ohm / 0.25 W;
- A piece of aluminum plate for a radiator;
- Several copper wires;
- Superglue, epoxy or liquid nails.

Assembling a powerful LED flashlight
Preparing the LED with lenses
We take a plastic cap with lenses, and mark the circumference of the radiator. It is needed to cool the LED. On the aluminum plate we mark the mounting grooves, holes and cut out the radiator according to the markings. This can be done, for example, using a drill.


We take out magnifying lenses for a while, now they will not be needed. Glue the radiator plate on the back of the cap with superglue. Holes, grooves at the cap and radiator must match.


The contacts of the LED are tinned and soldered with copper wiring. We protect the contacts with heat shrink tubing, and warm them up with a lighter. We insert an LED with wiring from the front side of the cap.


Processing a flashlight body from a syringe
We unlock the piston with the handle at the syringe, we will no longer need them. Cut off the needle cone with a paint knife.We completely clean the end of the syringe, making holes in it for the LED contacts of the flashlight.
We fasten the cap of the lantern to the end surface of the syringe with any suitable glue, for example, with epoxy resin or liquid nails. Do not forget to place the LED contacts inside the syringe.


Connecting the Micro Charging Module and Battery
We attach terminals with contacts to the lithium battery, and insert it into the syringe body. We tighten the copper contacts to clamp them with the battery case.
The syringe has only a few centimeters of free space, not enough for the charging module. Therefore, it will have to be divided into two parts.
We draw a paint knife in the middle of the module board, and break it along the cut line. Using double tape, we connect both halves of the board together.


The open contacts of the module are tinned, and soldered with copper wiring.


Final assembly of the flashlight
We solder a resistor to the module board, and connect it to the micro button, isolating the contacts with heat shrink.

The remaining three contacts are soldered to the module according to its connection diagram. We connect the micro button last, checking the operation of the LED.
LED "pocket" flashlights are in great demand among potential consumers. Diode designs have gained particular popularity. They have a bright light and are characterized by minimal energy consumption. You can buy this device in specialized stores or make it yourself at home.
Our article presents detailed instructions for a flashlight with your own hands. All the details of the workflow are displayed here. The advice of experienced professionals will help to cope with the task.

Advantages of LED flashlights
LED lamps are the most economical source of light radiation. They provide an uninterrupted stream of bright radiation at the most minimal power. In addition, it has a number of technical advantages over other lamps. These include:
- profitability;
- safety;
- reliability;
- a variety of simple types and ideas for homemade flashlights;
- long-term operation.


Since the finished installation consumes a minimum amount of power, many microcircuits have been developed for this, in which a single alkaline battery acts as the main power source.

As for the color scheme, several shades of diodes are on sale: green, blue, red, yellow, pink. For a cold shade, you must choose the white color of the bulbs. They have a wide angle of illumination.

Where are LED lights used?
The portable design of a flashlight with diode illumination has a wide range of applications. It is used where there is no access to the lighting device. It can be used in the garage, cellar or when working in the garden.

The device can work up to 6 days without changing the battery. Some models are equipped with a replaceable battery pack that can be constantly charged from the mains. For this, a special socket with clamps is included in the package.

In the process of making a homemade flashlight, you can make an additional mount. As a result, the device is attached to any surface while freeing your hands.


Before you start the workflow, you need to choose the right diagram that will show you how to make a flashlight with your own hands. Technical drawings indicate detailed requirements for electrical parts.

Master class on assembling a flashlight with a bright diode
How to make a flashlight with your own hands? The assembly process is quite simple, but interesting. To make this design, you need to purchase a DFL-OSPW511P LED. These lamps have a powerful lighting component that gives powerful illumination within 1m.


For this you will need:
- two power supplies. To do this, it is enough to purchase two flat batteries in the form of tablets;
- food department. This will reduce the energy loss during operation;
- bright diodes 5 pcs.;
- button to turn on and off the device;
- hot glue. It will ensure a tight fixation of the microcircuit in the design case;
- soldering iron;
- resin for soldering parts.


When all the components are prepared, we proceed to the workflow. It includes the following items:
On the old motherboard, we fix the battery compartment with a soldering tool. We solder the wires from the power button to the positive pole of the power department. The other end to one of the legs of the diode.

We fix the second section of the diode leg to the minus section for batteries. The result is a simple electrical circuit. When you press the button, all departments will be closed, which will provide the desired glow of the device.

When all the elements are in place, you can place the circuit in the device case.

At the end of the assembly, we install the battery and turn on the finished design to check the performance. Insert batteries with the correct polarity. Incorrect installation will lead to premature failure of the light fixture. The photo of a homemade flashlight shows the finished model.

DIY flashlight photo


In fairy tales, we often read about the path through a dark forest to a small source of light that suddenly appeared between the trees, or about a hall decorated with multi-colored lights, or about a mysterious kind person who lights lanterns in the evenings ... Maybe this is where our love for homemade flashlights - to those who have a living light inside or to those who remind us of this light?
Today we will talk about lanterns, which, if desired, you can make yourself or with the participation of children - for a room, for a garden, for a Christmas tree or a corner of dreams. Such magic lanterns can easily turn an ordinary evening into a fairy tale.
What materials can you make lanterns with your own hands? We have collected a lot of ideas for inspiration - here is a paper lantern, very simple, but a garden lantern - probably full of stars ... Here is an icy one, here is an orange one, and here is a lantern from what is at hand - for example, from clothespins ...
However, first things first…
Paper lanterns - simple and intricate
The simplest and most fun
Any child can make colored paper lanterns with their own hands. Look at the samples: the main thing is to have a desire to decorate it and stick light paper ribbons - let them sway at the slightest breath. Like fire!
The best children's books
The flashlight itself is such a cute symbol that some homemade flashlights are forgiven for their non-functionality: even if they do not shine, they are still beautiful! Also, imagine how fun it is to make them!
Transformations of classic paper lanterns
You can decorate those lanterns that you already have (for example, lanterns from Ikea are very grateful in this regard) - and bring a completely new note to the atmosphere of the room.
Paper flashlight: pierce more holes!
There are different models of paper lanterns that you can make with your kids. For example, such multi-colored polka dots with holes will decorate even a very simple model, and most importantly, it will easily and cheerfully replace a full-fledged developmental activity.
Paper lantern in the form of a house
Wonderful lanterns-houses (or palaces) will surely remind you of three bewitchingly beautiful ones, and it is very easy to make them. Probably, if you draw templates together with children, using all your imagination, it will turn out even more interesting than in the photographs. The main thing is to make grooves, and you don’t even have to get dirty with glue: everything will hold on!
DIY origami lanterns
You can also make paper lanterns using the origami technique. Here by yourself paper lanterns in the form of a flower (or a star?), but how to make them - you can see a detailed master class at the link.
If you want to let the wind of wandering into the house, then lanterns from photographs of beautiful buildings and castles will look very unusual and stylish. How to make them? It is not at all surprising if you already understood - but you can look at the source just in case.
magic balls
Home-made lanterns made of thread or narrow braid ... The authors assure that it is very simple - a balloon, glue, thread, a needle that will pierce a hole in the balloon ... Probably really simple. And the result looks so natural, as if these balls grow on trees on moonlit nights.
homemade lanterns, or patterned shadows
If this matches the interior, napkin lanterns will be a wonderful solution. How to make them?? By sewing a "lace sleeve" for a jar or a suitable vase. There is also the technique of staining from a spray gun through a napkin - but this is if you don’t feel sorry for the original handmade ...
Decorative lanterns from clothespins
Dear, very simple idea for those who have ... wooden clothespins. You will need: an empty tin can, a transparent glass, clothespins - and candles. A wonderful idea for a backyard party and any time of the year!
Gold-silver? Magic thick foil lantern
How to make a flashlight with your own hands - safe, shiny, fabulous? A very interesting technique you can try is making a flashlight out of thick foil. Extrusion of lines (almost like in chasing), cutting through windows ... We draw a house on a rectangular sheet of foil, and as a result we assemble a three-dimensional shining fairy-tale house! Who lives in the house? Of course someone is very nice!


Light sources of new generation - light-emitting diodes - despite still high cost become more and more popular.
Due to their low power consumption, they are successfully used not only in stationary lighting fixtures, but also in stand-alone, battery-powered ones.
In this article, we'll show you how you can do led lantern with his own hands and what advantages he will have in comparison with the usual.
 An LED (foreign name - Light Emitting Diode or LED), like a conventional diode, consists of two semiconductors with electronic and hole conductivity.
But in this case, such materials are used, for which the glow in the pn-junction zone is characteristic.
Generally speaking, LEDs have been used in electronics for a long time.
But before they glowed barely, and therefore were used only as indicators, for example, indicating that the device was turned on.
With the development of technology, LEDs have learned to make much brighter, so they have become full-fledged light sources. At the same time, their cost is constantly decreasing, although, of course, they are still very far from an ordinary light bulb.
But many buyers are willing to overpay, because LEDs have a number of advantages:
- They consume 10-15 times less electricity than incandescent lamps of the same brightness.
- They simply have a huge resource, which is expressed in 50 thousand hours of work. Moreover, manufacturers back up their promises with a warranty period of 2 or even 3 years.
- They emit white light, very similar to natural.
- They are much less afraid of shocks and vibrations than other light sources.
- They have high resistance to voltage drops.
Thanks to all these qualities, LEDs today are confidently replacing other light sources from almost everywhere. They are used in everyday life, and in car headlights, and in advertising, and in portable flashlights, one of which we will now learn how to make.
Required elements for manufacturing
First of all, you need to get all the components that will make up the device.There are not many of them:
- Light-emitting diode.
- Ferrite ring with a diameter of 10 - 15 mm.
- Wire for winding with a diameter of 0.1 and 0.25 mm (pieces of 20 - 30 cm).
- Resistor 1 kOhm.
- NPN transistor.
- Battery.
Well, if you can get the case from a purchased flashlight. If it is not there, any base can be used to fasten the components.
Assembly diagram
If everything is ready, we can start:
- We make a transformer: a ferrite ring will act as a magnetic circuit of a home-made transformer. First, 45 turns of winding wire with a diameter of 0.25 mm are wound on it, forming a secondary winding. In the future, an LED will be connected to it. Next, from a wire with a diameter of 0.1 mm, you need to make a primary winding with 30 turns, which will be connected to the base of the transistor.
- Resistor selection: The base resistor should be approximately 2 kΩ.
But the value of the second resistor must be selected. It is done like this:
- a tuning (variable) resistor is installed in its place.
- Having connected the flashlight to a new battery, set such a resistance on the variable resistor that a current of 22 - 25 mA flows through the LED.
- Measure the resistance value on a variable resistor and install a constant resistor with the same rating instead.
As you can see, the circuit is extremely simple and the probability of error can be considered minimal.

Do-it-yourself LED flashlight - diagram
If the flashlight still turned out to be inoperative, the reason may be as follows:
- In the manufacture of the windings, the condition of multidirectional currents was not observed. In this case, the generation of current in the secondary winding will not occur. For the circuit to be working, you must either wind the windings in different directions, or swap the conclusions of one of the windings.
- The winding contains too few turns. It should be borne in mind that the required minimum is 15 turns.
If they are present in the winding in a smaller amount, the generation of current will again be impossible.
DIY 12 volt LED flashlight
Those who need not a flashlight, but a whole spotlight in miniature, can assemble a device with a more powerful power source. As the latter, a 12-volt battery will be used. This product will have several big sizes, but it will still be easy enough to transfer.
To create a high power light source, you need to prepare the following:
- polymer pipe with a diameter of about 50 mm;
- glue for gluing PVC parts;
- a pair of threaded fittings for PVC pipes;
- screw cap;
- toggle switch;
- 12 V LED;
- 12-volt battery;
- auxiliary elements for the installation of electrical wiring - heat shrink tubes, electrical tape, plastic clamps.
As a power source, you can use several batteries from broken radio-controlled toys, which are combined into one battery with a voltage of 12 V. Batteries, depending on their type, will need from 8 to 12.
A 12-volt LED flashlight is assembled like this:
- We solder pieces of wire to the contacts of the LED, which are a couple of centimeters longer than the battery. In this case, it is necessary to ensure reliable isolation of the connections.
- The wires connected to the battery and the LED are equipped with special connectors that allow you to make quick connections.
- When assembling the circuit, the toggle switch is installed so that it is on the opposite side with respect to the LED. The electronic filling is ready, and if the tests have shown that it works properly, you can start manufacturing the case.
The case is made of a polymeric pipe. It is done like this:
- The pipe is cut to the desired length, after which all the electronics are placed inside it.
- We put the battery on glue so that it remains motionless during carrying and manipulating the flashlight. Otherwise, a heavy battery may hit the LED element and disable it.
- We glue the threaded fitting to the pipe at both ends. Glue does not need to be saved - the connection should be tight. Otherwise, water may seep into the housing at this point.
- We fix the toggle switch inside the fitting installed on the side opposite to the LED. We put the switch on the glue, while it should not protrude outward so that the plug can be screwed onto the fitting.
To switch the toggle switch, the plug will need to be unscrewed, then reinstalled. This is somewhat inconvenient, but this solution ensures complete tightness of the case.
A question of price and quality
Of all the flashlight components, the 12-volt LED is the most expensive. You will have to pay 4 - 5 USD for it.Everything else can be obtained for free: batteries, as already mentioned, are removed from radio-controlled toys, plastic pipes and parts very often remain as waste after installing plumbing or heating in a house.
If absolutely all the components have to be purchased in a store, then the cost of the lighting device will result in about 10 USD.
 A homemade lamp from an LED strip can be built quickly and easily. - see the manufacturing instructions and make your own unique product.
Read about how to properly install the LED strip with your own hands.
Conclusion
A handy flashlight that gives a bright light and at the same time is able to work for a long time without recharging the battery is always needed in the household. As you can see, you can easily make it yourself, which will save you some money. The main thing is to be careful and strictly adhere to all the recommendations set out in the article.
Related video