Perhaps there is not a single woman in the world who would not love flowers. But, as you know, plant creations of nature (garden or cut) quickly wither and cease to please their mistresses. Is it possible to make the life of an amazing miracle of nature called "flowers" infinite? There is one wonderful way! Try to perpetuate the images of flowers by repeating their exact embodiment with your own hands using threads.
Flowers can be woven, embroidered, knitted, made with wire and special improvised means. Making flowers from various threads is an extremely interesting and exciting activity that requires perseverance, patience, as well as creative imagination, sleight of hand and an excellent eye. Let's gather our courage and try to make beautiful artificial flowers from threads.


Yarn
The first and most necessary thing in order to make artificial flowers with your own hands is yarn. The choice of yarn largely depends on your idea, on what kind of flowers you want to make. Naturally, take the color of the threads in the color palette in which the creation you have conceived is located. Of course, you can experiment and make a creative blue rose, an exclusive black peony or a unique white poppy. But it is better to follow the traditional colors so that your work is recognizable. The texture of the threads should also be within the framework of "decency", because. It is not easy to work with complexly structured yarn with your own hands.
It is better to choose the average thread thickness. Especially if you are a beginner needleworker. But what if there is no yarn of the right thickness that matches the color? Fold thin threads with your skillful hands in 2 or more additions, and the volume of thick threads can be reduced if they are stratified. The most suitable composition of yarn for creating flowers with your own hands is acrylic. Fluffiness, the ability to stretch a little and easily wrap around the wire - these are the qualities of these threads that will be useful to you in creating crafts. You can use threads and a mixed composition, if such a master class suggests using the advice of which you decide to follow.
Knitting needles and hook
These tools, familiar to all knitters, will also come in handy in the process of creating flower crafts. Take thick knitting needles for creating large flowers, thin ones for small plants.
Wire
Creating flowers and leaves of different sizes involves the use of wire of different thicknesses. Thick wire will come in handy for weaving the base of twigs, large petals. A small diameter wire will be needed to make elegant, almost airy leaves. Before you start working with the wire, wipe it with a cotton swab dipped in an alcohol solution to remove any oily deposits, or wash it with soap under running warm water. This way you guarantee a neat and tidy look of future crafts. The composition of the wire used can also be different. Take a strong, rigid steel wire for trunks, plant branches, and copper wire, which easily takes any shape, is suitable for the base of buds, flowers, and foliage.
Pliers, wire cutters and scissors
You will need these tools in order to work with wire: somewhere to “bite off” an even piece of wire, somewhere to firmly press the protruding part of the base of a flower or leaf, or to weave the ends of a thick wire. Strong, very sharp scissors will be needed to cut the threads of the desired length and a whole bunch of them. Additional materials that you may need when creating flower crafts - glue, cotton wool, foam rubber, cardboard, acrylic paints. With paints, for example, you can correct a section of wire that was accidentally missed when winding threads. With the help of paints, you can create such flowers, the yarn for which is difficult to find. So, the necessary tools for creating flowers with your own hands are ready, now let's formulate the basic general provisions for making flowers from threads.
Plan for creating a flower from threads
- Take a close look at the flower you want to reproduce with wire and thread. To create the correct proportions of the product, measure, using a ruler or centimeter tape, the length / width of the leaves and flowers;
- Reproduce an exact copy of all floral elements, trying not to deviate from the size of a real plant. You can weave a wire outline and attach it to a real flower, thereby creating an exact copy of the plant;
- To create flowers of complex shape, you can first draw its outline on paper. When creating flower components, apply them to the sketch and adjust the length and width parameters if necessary;
- Combine all individual fragments into a single whole.
All of the above items can be done independently, showing imagination and your own skills.
How to make leaflets with your own hands
Flower leaves of different shapes and sizes can be made in two ways:
Use wire, thread and knitting needles.
Using this technology, you can make not only leaves, but also petals for flowers.
- apply a small master class on creating petals;
- type on the knitting needles of the required thickness of the loop, using the yarn of the selected thickness and color;
- carefully transfer the loops to the wire;
- bend the wire in half;
- fasten the ends of the threads;
- twist the wire along with the threads and cut off the excess wire;
- by giving the wire a different shape, you will get the necessary leaflet.
Winding method
This method is suitable for the manufacture of leaflets of complex shape. For each petal, its own individual frame is made. First, the entire wire frame is wrapped with a thread, and then the space between the wires is filled with yarn. If desired, you can sew the edges of the sheet with threads of a different color or shade of the main color scheme, or weave a cord, which is then sewn to the edge.
Tips for making leaflets:
- Completely fill the inter-wire space;
- Try to wind the wire without gaps;
- Gently hide the tails of the threads under the base of the leaf.
Take a few threads yellow color(stamens) and fasten them with a thin wire. Attach flower petals alternately, screwing with wire. Add a thick wire, which you will later use as the base of the stem.
You know the basic rules and techniques for creating flower crafts. It's time to start making a specific flower.


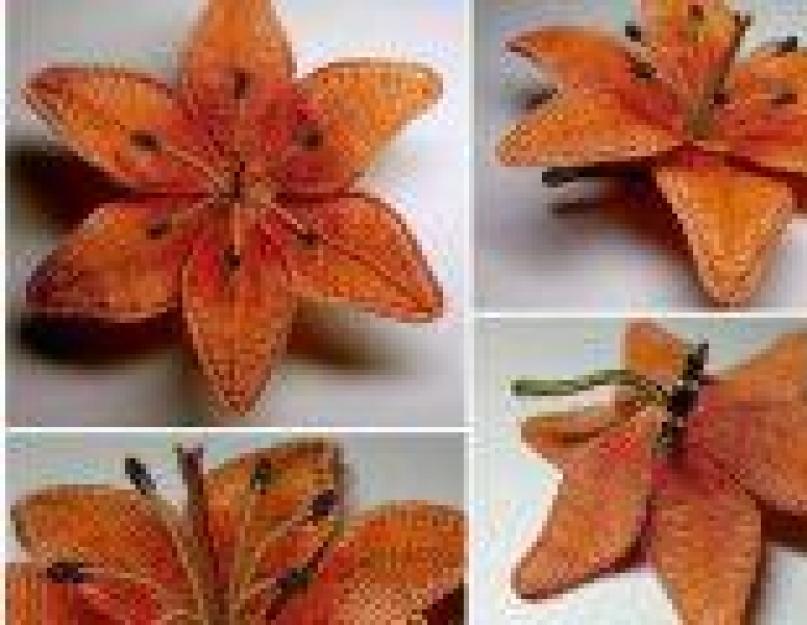
Master class on making a tiger lily
For this craft, you need to prepare:
- a small coil of thin wire;
- a few threads of yellow, red and light green;
- acrylic paints and a thin brush;
- a piece of cotton;
- PVA glue;
- red nail polish.
The master class for creating a tiger lily is not as complicated as it might seem at first glance.
- Take a thin wire and bend it in half, trying to give an elongated shape to the future petal. Focus on real flowers or on a photo that can be viewed on the Internet;
- Wrap the upper part of the petal with red threads (winding method), and the lower part with yellow threads;
- With a thin brush using acrylic paints, “smooth out” a sharp transition from one color to another;
- On the yellow part of the petal, draw small brown dots;
- Repeat steps 1-4 4-5 more times. You will get 5-6 flower petals;
- Make stamens. To do this, tightly twist a small piece of wet cotton wool, wrap it in the middle with a thin wire, twist the ends of the wire, leaving the ends of the required length. If you have live lilies as a "model", just measure the length of the stamens;
- After drying, cover the cotton wool with 2-3 layers of PVA glue (each layer should dry well) and paint the made stamens with red varnish or acrylic paint, or wrap it with a thin red thread. In total, you need to make 6-7 pieces;
- From green threads, fleece and glue, make a pistil (similar to stamens), the size and shape of which “peep” from a natural tiger lily;
- Place the stamens around the pistil and screw on. Bend the stamens down a little in the image and likeness of a living flower;
- Add ready-made lily petals to the resulting design. Try to attach some (3) petals with inside, and 2-3 petals - from the outside;
- Wrap all the remaining parts of the wires with a light green thread. Do not forget to add thick wire for the stem and continue winding with threads, fixing it in several places with glue to the wire;
- If you want to reproduce real tiger lily flowers, then you need to make some more green leaves. Use one of the methods above. As you wind the stem, attach the required number of leaves. If you want to use a tiger lily in a composition with other flowers and the presence of leaves is not necessary, skip this step of the master class;
- Secure the end of the thread with glue or just sew.
We hope that the master class helped, and everything worked out for you !!! Flowers made by you will be able to please your eyes for a long time.
Sometimes needlewomen are faced with a problem when a large number of small balls of thread or yarn remain, from which it is no longer possible to make something worthwhile.
They often put all these hanks in a basket or bag, leaving them for a period when they still figure out what to do with these little balls.

We confidently declare: after reading our article, you will no longer have to puzzle over this issue, because we will provide you with several interesting ideas the use of threads and yarn to decorate the interior of your own home with crafts made from woolen threads for knitting and ordinary fine yarn.
This hobby was invented a long time ago and quickly spread around the world due to its practicality, because it is impossible to calculate a skein of thread so as to use it up to a centimeter. In addition, in ancient times, threads were the only way to make and give a doll to a child.

Now there is no such problem. The modern market offers a bunch of toys that can impress your baby with their originality and uniqueness, but can at least one of them be compared with the one that is made by yourself, and into which you have invested a piece of your soul and boundless maternal love.

Well, if you make this masterpiece of needlework together with your baby, then the process of making crafts from threads with your own hands will forever remain in his memory as one of the warmest moments in life.
From threads, you can make not only crafts from threads for children in the form of various dolls, cute figurines of animals, but also paintings, vases or decorations for lamps.

Consider a few master classes that will make you a real master in this area.
Pictures from yarn
If you do not know how to use many small pieces of thread, which are no longer enough for pompoms and kits, then make a picture out of them. To do this, you do not need a large amount of materials. All you need is scissors, cardboard and glue, and don't forget about the threads themselves.
Follow the algorithm of our lesson, and you will get an excellent result:
- On cardboard, circle the outlines of the pattern that will be created with threads. If you printed the finished picture, then stick it on top of the cardboard.
- Now you have a long job ahead of you. It is necessary to cut all the threads into small, small pieces. Entrust this task to your child or do it together with him. So you cheer him up and at the same time make him work a little. All pieces must be sorted by color.
- Now start creating the picture. To do this, step by step, lay out threads of the same color on a heavily glued area of \u200b\u200bthe pattern.
- So it is necessary to continue until there is not a single empty space left in the picture.
- Let the masterpiece dry and you can safely hang it on the wall!
Yarn flowers
If you still have floss or iris threads, then with the help of them you can create crafts from a ball or paper and threads in the form of flowers of incredible beauty.

To do this, you only need threads, glue, a piece of newspaper, which we will use as a blank, scissors and wire.

If you want to make flowers some original, grab some ribbons and beads. Let's start our master class of crafts from threads.

Manufacturing instructions
- Create flower blanks. This is quite simple to do: you just need to crumple a large piece of paper or newspaper and make a ball out of it.
- On this homemade ball we will wind a thread soaked in glue. We decided to create a composition of delicate white bells, so we need a skein of white threads or floss threads with blue and white inserts. This combination will look very interesting and gentle.
- After the ball reaches enough large sizes and there will be no gaps and “bald” areas on it, it is worth letting it dry.
- After a few hours, you can return to work on your craft. Now you need to carefully cut off the excess from the ball, giving it the shape of a flower, in our case, a bell.
- Carefully thread the wire into these buds and fasten each bell on it, decorating the place of fastening with beads.
- To hide our wire stalk, we again impregnate the thread with glue, this time we take a green thread, and wind it around the wire.
Below you can see photos of thread crafts. We hope that, inspired by one of them, you will be able to create your own masterpiece.

Photo crafts from threads


Note!


Note!


Recently, floral-themed decorations have become very popular, in this master class we will tell you how to make a beautiful decoration - weaving a floss flower with your own hands. In the future, you can make earrings or a bracelet from these flowers.
Production time: 1.5 - 2 hours
Difficulty: medium.
Materials:
1.7 colors or shades of floss or iris threads.
2. Scissors
3. Scotch and patience?
Here's what you can get? (you can use any colors you like!)
Today I will make earrings "Watermelon Mood". Well, let's start!
To weave a flower, you will need 7 different flowers (each 3 meters per flower) Our flower will have 6 petals. You can cut all the threads in advance, you will need only 42 threads about 35-40 cm long. Choose a color for the middle of the flower (I chose black) Cut the threads.


Then we insert the entire bundle of threads into the loop formed, and tighten. You have got the center of the future flower, now we carefully divide the threads “in pairs”, that is, there should be two threads in a pair, which were previously one knot on the main one, the evenness of your product depends on this. Here:

Now we begin to make out the first petal. For one petal, we need 6 threads of different colors (optional) Arrange the threads in the process of weaving also to your taste.

We separate the first double thread, remove the rest.


Next, we do the previous step with all the other 5 threads in order (the same order will be observed on other petals, so it’s worth remembering it. We got something like a thin “furry” baubles

Then again we return to the very first thread (in my case, red). Divide the threads in half to the middle - black threads. First, we take the left red thread, put it on top of the left strand of colored threads and make an ordinary double knot “to the right” (IMPORTANT! Tighten the knots with the same force.)

It turns out that the red thread is on top of the left strand of threads. Next, we take the right red thread and make a double knot "to the left" on the black one. Then we tie 2 red threads in the middle with a double knot.

We have taken the first step and processed the red thread. Next, we take the next one (that is, the second one, which was located by shamba - knots) We take the right pink thread and make double knots “to the right” on the red, black threads. Next, take the left pink thread and make double left knots on the red and black threads. Then we make a common knot of pink threads. We are done with pink threads.

After that, we continue in order to process the right then the left strand, then tying it together. The main thing is to follow the order (from the initial position of the colors) and make double knots. It is also important not to confuse the right with the left leading threads. Here's what happened at the end:

All! The first petal is ready, congratulations! But the ends - the edges of your petal are not processed - in general, you can leave it like that, and then just cut the threads to a length that is convenient for you, but in my opinion the flower looks more finished and neat only when it is finished with a “candy” bauble technique. In the next master class, I will show you how to weave a “Watermelon Mood” candy bauble, and now you will learn how to beautifully process the ends of the petal. You can process the ends by weaving every two petals or at the very end (which is worse for me) So, we weave the second petal using the same technique. We separate the next double thread and process it with six colors (according to the scheme of the first petal).

Now we have two unfinished flower petals. Here:

We take two extreme threads (In my case, black) and tie them together with a double knot.

We begin to make out the edge of the right petal with a “candy”. We make a knot with the right red thread to the left on the black (double).


Then we repeat the same thing, making double knots “to the left”. White on pink, red, black (one double knot) Next, 1 knot on 4 strands, etc. You get a fully decorated left side of the second petal (you can process the right side by making the third petal)

Now move on to the left part of the first petal (right strand) by making double knots on all strands (same as on the second petal of the first part).

We continue to do this with all the petals of our flower, weave a petal, the second one, close it with candy and in the end you get a finished flower. It remains to cut the threads and glue them back (you can glue felt on them) Your flower is ready!

Thank you for your precious attention
Most of us at least once in our lives made some crafts: for a school for a child, as a gift for a loved one, or just for the soul. That is why you probably know the pleasant feeling when, after painstaking work, a beautiful and original thing is obtained. What can be done if such a desire arises?
Thread flowers are a great option for beginners. This job does not require special skills and a large number additional materials, so everyone can handle it. There are several different ideas, so you can pick up what you like.
Crafts differ from each other in additional materials, as well as in the level of complexity. Please read carefully before starting work step by step instructions to understand the sequence of actions.
How to make a thread flower
 In order to make a flower out of thread, you will need to choose a base for it. One of the most successful solutions will be cardboard. With it, you need to cut out the template on which the threads will be wound. Of course, you will also need other sewing accessories, such as scissors.
IMPORTANT! Decide in advance what kind of flowers you will make, so that it is easier to pick color scheme and quantity of materials. In most cases, these are dahlias, roses or peonies, but you can use any flower you want. It can also be just a generalized image that does not have the features of any type of color.
When everything you need is found, you can start step by step work.
- You need to cut out a circle from cardboard and mark the markup on it.
- You can attach pins in the form of beams to the cardboard to make it even more convenient.
- Then it remains only to wind the material in the necessary way and get rid of the base.
You will get a small cute product that can be pinned to a sweater or given to a friend.
How to make a flower from knitting thread
You can also use woolen knitting threads. Then a good option would be to crochet flowers.
For this you will need:
- threads;
- hook;
- scheme of the future product.
 A large number of various schemes can be found on the Internet or in thematic magazines. You can easily knit any decoration using them, without calculating sizes and other important parameters.
IMPORTANT! If you have never crocheted before, this is a great opportunity to learn. If you choose the most light scheme flower, in a few hours you will have in your hands a magnificent product made by yourself, which will serve as a motivation for further development.
A feature of knitting is that you can make not only flat flowers, but also lush or voluminous. It all depends on your desires and imagination.
DIY flowers from threads and glue
A more complex product will be the option of using glue.
You will need:
- threads;
- fingertips;
- glue;
- oilcloth;
- scissors.
First of all, you should inflate the fingertips so that they take the shape of a ball, and then glue them with white thread and let them dry. Green threads, pre-moistened in glue, spread on oilcloth and crush.
 The resulting white ball subsequently needs to be cut so that several petals are obtained - in the shape of a peony flower. The rest of the fingertip can be removed at this stage. Then, from the resulting green “carpet”, we cut out the necessary elements resembling leaves and glue them to a white bud.
The craft is ready!
DIY flowers made of thread and wire
The best material for the base of the craft is wire, because with its help you can achieve the strength and hardness of the flower. Ready-made wire bases are on sale, on which it remains only to wrap the material tightly. 
But if desired, the form can be made independently. Please note that the wire is very smooth and slippery, so special curls are required on which the threads will be attached.
Another advantage is that it can be wound in several layers. In this way, you can achieve organicity and greater credibility of the flower. This is an excellent field for experiments - do not look for detailed relentless instructions, but create yourself exactly what you have a soul for. 
IMPORTANT! Correctly fasten the threads after they have been wound on the wire. So that the product does not disperse after several hours, make tight knots and cut off everything that is superfluous.
Now you know, there are so many ways to make flowers from threads with your own hands. Such an original and interesting gift will not only delight your loved ones, but will also be a great decoration for a room or clothes. And after you complete your first craft, creativity can become your favorite hobby that gives good mood, useful result and just pleasure from the process.
Is there at least one woman in the world who is indifferent to flowers? But everyone knows that these fragile charming creations of nature do not live very long - both cut and growing in the garden. They quickly wither and cease to bring joy to the hostesses.
What to do?
How to prolong the life of these little wonders of nature? There is, perhaps, only one way - to perpetuate them by making elegant crafts - flowers from threads - with your own hands (for example, from yarn). weave, embroider, knit, make from wire and a variety of materials at hand. There are also flowers made of threads on cardboard. It is not at all difficult to make them with your own hands.
Creating flowers from multi-colored threads is a creative and very exciting activity. The craftswoman will require a considerable amount of patience and perseverance. In addition, you need a fantasy, without which it is difficult to come up with something original. Of course, a good eye and dexterous flexible fingers are important.
Well, let's try to do this exciting thing - creating fantasy flowers from threads with our own hands.
What do we need
Any work requires preliminary preparation of all necessary materials and auxiliary tools. In this case, we need threads or yarn. We will choose it depending on the conceived model, having decided on the type, color and size of future products. The color palette depends on this, which is most reasonable to take in the traditional range - for recognition.
Of course, you can make bright blue roses or black peonies. Maybe it will be original. But in our case, it seems that our do-it-yourself thread flowers should have the maximum resemblance to natural prototypes. For the same reasons, we pay attention to the texture of the threads. If the yarn is very complex, intricate structure, it is not easy to work with it, and the result is not always predictable.
It is best to take threads of medium thickness, especially for needlewomen without experience. If you cannot find a suitable yarn, you can take a thinner one and fold it two or three times. The volume of too thick threads, on the contrary, is reduced by delamination.
The easiest way to make flowers is from acrylic. This yarn has all the necessary properties - it is fluffy, slightly stretchy, it is easy to wind it around the wire. However, threads of mixed composition are not prohibited either.

Knitting needles, hook and wire
You can’t make it with your own hands without a hook and knitting needles. Let them be different sizes. Thick knitting needles will have to knit large flowers, thin - smaller ones. Not to do in our business and without a wire of various thickness. Its large segments will make up the frame of twigs and large petals, a small diameter will be used to make weightless airy leaves.
The wire before starting work must be cleanly washed to eliminate possible oily deposits. This can be done by wiping it with a cotton swab soaked in alcohol or by simply washing it with soap and water under the tap. So our future craft will look neat and clean.
The wire may vary in composition. For the stem of each flower, strong steel is suitable, which almost does not bend. She will also be able to imitate large branches. Thinner copper wire, which is easy to bend, will become the basis of leaves, petals and buds.
What else is needed
From the tools you should take scissors, wire cutters and, of course, pliers. Without them, working with wire is difficult. You will need to bite off its even pieces, press the protruding tips or weave them together and fasten. Sharp strong scissors will be needed to cut the threads - sometimes in a whole bunch.
The needlewoman cannot do without additional materials - glue, foam rubber, cotton wool, cardboard, acrylic paints, with which you will have to tint a piece of wire that accidentally remained unfilled during the process of winding the thread. With the help of them, you can also change the color of the yarn if you could not find the desired shade in the store.
Having prepared everything you need (material, tools), let's think about a plan for creating our future product.

Preparatory work
How to make a flower from threads with your own hands? If you wish to reproduce one or another of its types, consider the sample in the most careful way. Pay attention to the aspect ratio. Perhaps, taking a ruler, you will have to measure the comparative sizes of the petals and buds.
Then try to copy the floral elements, repeating the dimensions of a real live plant. The basis for you will be a wire loop, woven and applied to a living flower to adjust the size and shape.
If your future product has an intricate outline, it is first drawn on paper. All components are created separately, then applied to the sketch to adjust the dimensions - width and length. After that, the disparate fragments are joined together.
Making leaflets
Flower leaves of any size and shape are made in one of two ways. The technology of the first of them involves the use of threads, knitting needles and wire. Using these techniques, not only leaves are created, but also flower petals.
So let's get started. Loops of the required width are cast on the knitting needles from the yarn selected by color and thickness. Then the dialed row of loops is carefully transferred to the wire, the segment of which should be bent in half and the ends of the threads should be fixed. The wire is twisted together with the thread, the excess protruding ends are cut off. From such wire loops, giving them different forms, you can get a lot of leaves and petals.

Second way
Another method is winding. Thanks to him, we can get leaflets that have a more complex shape. The work is hard work and requires a lot of patience. The basis of each petal is its own individual small frame. Having bent it from a wire, wrap it with a thread, then fill it with yarn.
The edges of the leaf can be decorated by carefully stitching with another thread (contrasting or slightly different in shade from the main color). You can weave a thin cord from threads and sheathe the edges of the petal with it.
What you need to know when making these leaves? The space between the wires must be completely filled. Without this, our product will not look neat. When winding the thread, try not to allow gaps. The ends of each thread should be carefully hidden under the warp.
How to make flowers from threads with your own hands: master class number 1
As an example of making such a craft, we give a small master class on creating a specific flower - a tiger lily.
What should be stocked up? First of all, a small coil of wire (quite thin) and a certain amount of thread. Take the colors red, yellow and light green. Prepare a set of acrylic paints with a thin brush, a little bit of cotton wool, a tube of PVA glue and red nail polish. Don't let the work ahead scare you. The process of creating this graceful flower is not nearly as complicated as it seems at first.
Making a tiger lily
We bend a thin wire in half. Future petals should have an elongated shape. If you don’t have a real flower at hand, find the corresponding photo on the Internet. Using the winding method, surround the top of the petal with red threads and the bottom with yellow threads. The transition between these two colors should be smoothed out - painted over with acrylic paint.

Decorate a part of the yellow petal with small brown dots. One petal is ready. Repeat all of the above a few more times, making 5-6 of the same petals.
Then we move on to the manufacture of stamens. Wet a small piece of cotton wool and twist it tightly. Wrap the middle of the resulting lump with a thin wire, twisting the remaining tips of the desired length together. If you can keep a living flower handy as a sample, you can carefully measure the length of its stamens with a small ruler.
Cover the dried cotton wool with a couple of layers of glue, waiting for each of them to dry completely. In order for the manufactured stamens to take on a natural red color, they should either be painted with varnish (acrylic paint) or wrapped with a thin red thread. In total, you will need to make six or seven pieces.
Continuation of work
A pestle is made in the same way - using the same cotton wool, glue and threads, this time green. The shape and size of it will be prompted by the image of a real lily. Surround the pistil with stamens and secure everything together. For plausibility, slightly squeeze down each of the stamens, then the resulting design is complemented by pre-made flower petals. Some of them are attached from the inside, some - from the outside.
All remaining and protruding wire ends are wrapped with a light green thread, a thick piece of wire is attached to them, imitating a stem, on which the winding continues. To make the work look neat, the threads in some places should be fixed on the wire with glue.
If your goal is to achieve full plausibility, then you will need some more green leaves. They are mastered by one of the methods described above and attached simultaneously with the winding of the stem. If your tiger lily is part of a large flower arrangement with many different colors, you can do without green leaves.

easier option
But here's a simpler master class for you - do you want to quickly make a cute bright yellow bouquet of fluffy flowers from yarn? To do this, you need very little - in addition to a skein of woolen threads in a rich sunny color, take a long piece of thick wire or several metal skewers. Of the tools you will need wire cutters and scissors for threads.
Choose the optimal size for the length of each stem. It can be different - it will look more natural. Cut the wire or skewers with wire cutters into pieces of the selected length.
Wind the thread around the index and middle fingers, making about 30 turns. Leave the end long enough. Having removed the resulting hank from your fingers, tighten the center of the resulting small ball with a thread, dividing it into halves. All loops should be cut at the same time with scissors.
What will we get
Their size may vary, so you can take small scissors and cut each petal separately. Having fluffed the flower and giving it a spherical shape, cut off the protruding ends of the threads. Then fix the resulting fluffy ball on a wire stem.
You can make such flowers from threads with your own hands in the amount of 11-15 pieces or more, depending on the volume of the vase in which you want to put your bright elegant bouquet. The procedure for making a fluffy bright yellow "dandelion" is so simple that, having made one or two copies, you will automatically continue to craft while looking at the TV.
Such a bright yellow bouquet will not only decorate the window sill in the apartment, but also pleasantly refresh the interior in the office. It can also be given to friends as a fun gift.

We make flowers from threads with our own hands: another master class
Here's another wonderfully easy way. Even a child will master flowers from threads and glue with their own hands. You will need balloons, multi-colored coils, scissors and the same tube of PVA.
All balls are inflated and carefully tied so that they do not go down during work. The next step is to carefully wrap each of them with threads. To easily and freely unwind them from a spool or ball, put the threads in a jar with a wide mouth.
We begin to wind the threads on pre-coated with glue Balloons. As a result, we get several large multi-colored cocoons. After waiting for the glue to dry completely, remove the ball from the cocoon. To do this, it should be carefully pierced with a needle and pulled out through one of the cells.
Beauty, and more!
As a result, we have a weightless openwork product in the form of a ball of multi-colored threads. Now this ball should be cut into two hemispheres, and each of them, in turn, should be processed with scissors, rounding off the edges in the form of flower petals. Thus, each of the balls will bring us two bright wonderful elegant flowers. These do-it-yourself thread flowers for children can be an excellent decoration for a room for the holiday.
If you want your products to look even more elegant, you can decorate them with small rhinestones on top or sprinkle them with colored varnish.